Sunday, September 1, 2013

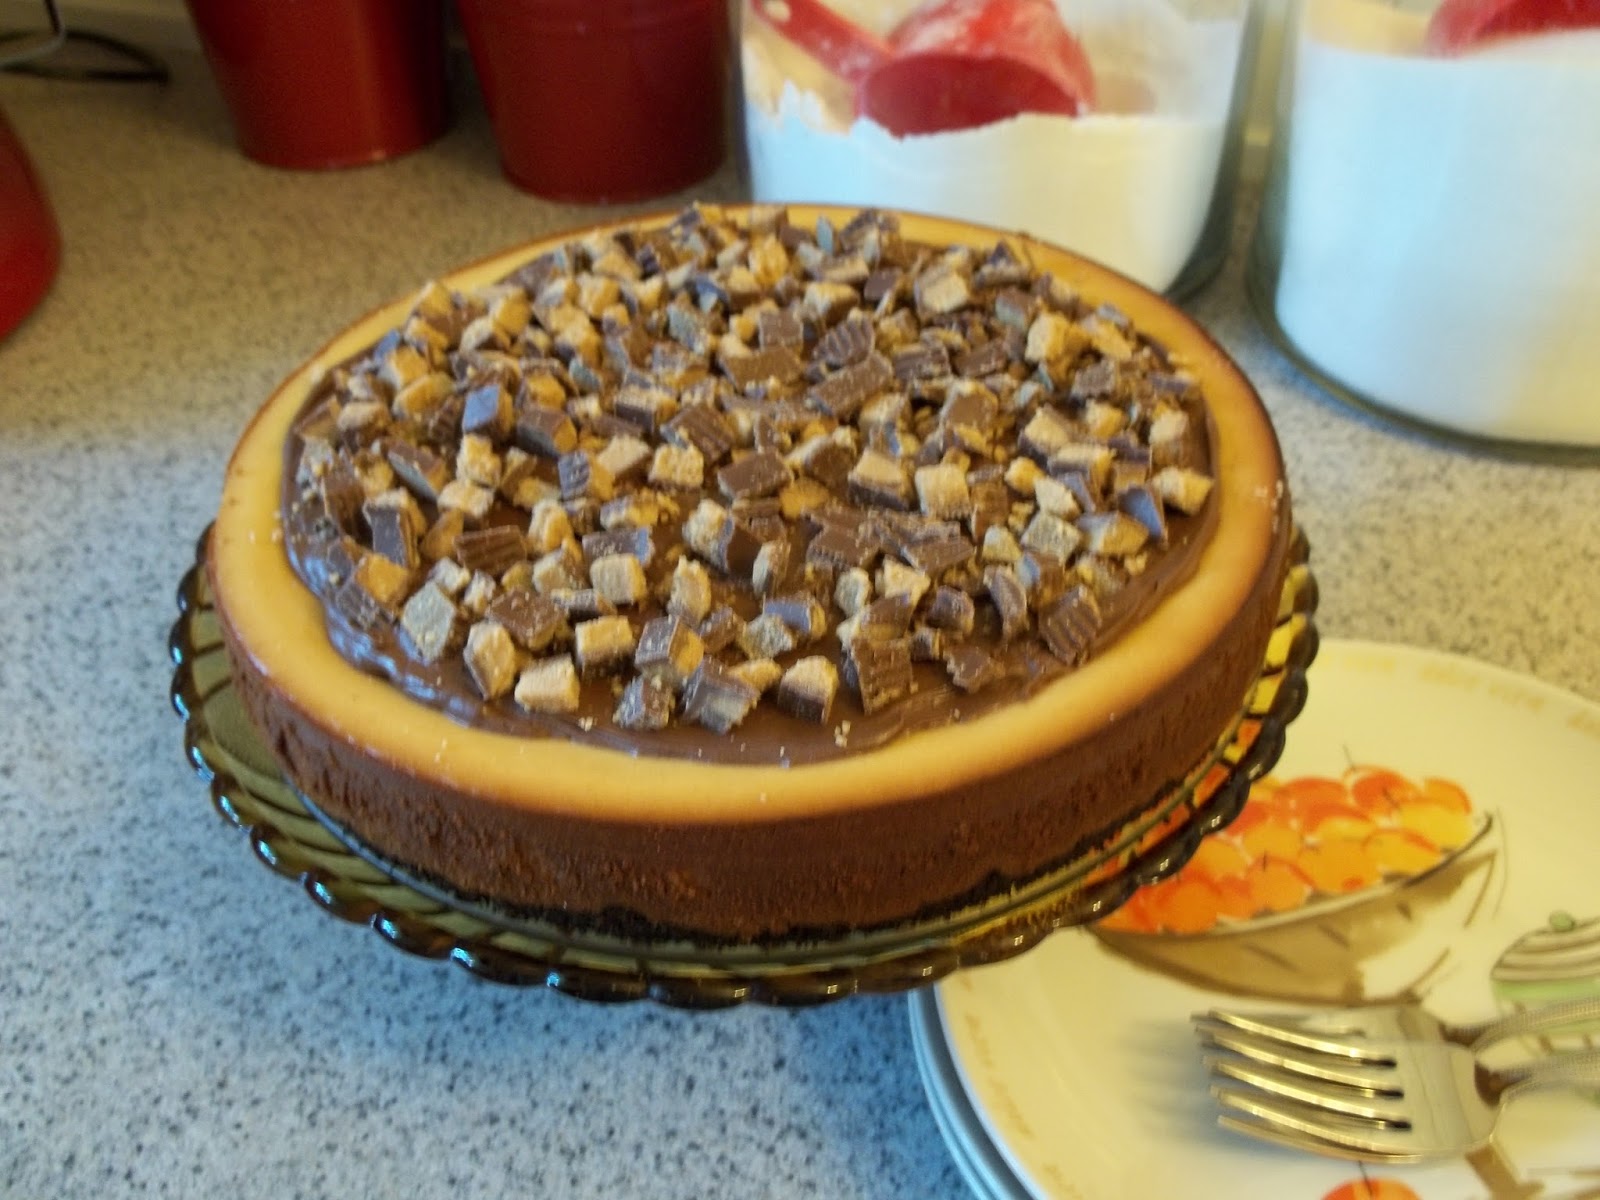
Peanut Butter Chocolate Cheesecake

There are lots of times when we all feel awful, whether it's because of work, family issues or just life in general.  The last two weeks have been very hard - we said goodbye to our sweet little pup almost two weeks ago and I've been having a very hard time without my little shadow to keep me company.

When I was visiting my lovely daughter and son-in-law yesterday, I was raving about a recipe I'd made for my younger daughter and her beau, which got the reaction "That's a keeper!"  I said I hadn't blogged in a long time and Megan encouraged me to start again, with this recipe.  She also doesn't like cheesecake, but after describing this, she now wants to try it!  Wonders will never cease...  After making an apple bundt cake this afternoon for a friend's visit tomorrow, I realized Megan was right and that it was time to blog again, because I really do love to share my recipes and results.

I got the original recipe, Reese's Peanut Butter Chocolate Mini Cheesecakes from 
Gimme Some Oven and a did a test run on my office buddies.  The reaction was great - my baker buddy Teresa's comment was (basically one word) "OmigoodIloveitcanIhavetherecipe?"  I only took 8 to the office and they were a universal hit.  The recipe said it could also be made as an entire cheesecake and I thought I'd try it that way, since it was actually less work to make one cake rather than a tray of minis.

 No surprise here, but of course I amended the recipe by reducing the fat content, increasing the crust base (essential!) and not making ganache as a topper.  Everyone loved it, so I'll keep making it this way!


Ingredients for Crust:
2 cups chocolate cookie crumbs - I got mine at Bulk Barn
4 tbsp melted butter

Cheesecake Ingredients:
2 bricks (16 oz or 500 grams) reduced fat, plain cream cheese
1/2 cup smooth peanut butter
3/4 cup light brown sugar, firmly packed
2 eggs, at room temperature
1/4 cup light cream - I used 5% coffee cream
1/2 tsp vanilla extract

Topping:
Prepared chocolate icing, 1/2 to 3/4 cup worth
Reese's Peanut Butter Cups, diced - I used 7 from a 12 pack

Preheat oven to 350 degrees.  In a medium bowl, whisk together the cookie crumbs and melted butter until thoroughly mixed.  In  8-9" springform pan, spread the crumb mixture evenly and bake for 10 minutes.  Allow to cool thoroughly while the filling is prepared.

In a large mixer bowl combine the cream cheese and peanut butter at medium speed, until smooth.  You will need the scrape the bowl at least once to make sure it's evenly mixed.  Add the brown sugar, followed by the eggs one at a time, then the cream and vanilla.  Scrape the bowl again to make sure everything is incorporated.  Pour over cooled crumb base.

At this point there are two trains of thought about baking cheesecake.  The traditional method is to use a "Bain Marie", or water bath, where the springform pan is wrapped in foil and set into a pan filled 2/3 of the way with heated water.  The cheesecake then bakes in this "bath" and you pray that there isn't even a teenie, tiny hole anywhere in the foil, because if there is it's curtains for your cheesecake.

I used another method and will do it again this way.  Instead of setting the springform into the pan of water, I put the water bath on the rack under the one with the cheesecake on it.  The theory is that the moist air in the oven will prevent the cheesecake from cracking, because it takes so long to bake and set.  Even with the pan in the water, I've had them crack.  With this cheesecake, a small crack formed along the inside of the pan, but I knew it would be covered by icing, so I wasn't worried.

Bake the cheesecake for 45 minutes, then allow to sit in the cooling oven for another hour to fully set.  There is no way to cut back on the time with this step, so don't even consider it.  ;)  At this point, it will need to be chilled at least four hours or overnight for the flavour to fully develop.  This is also the real reason cheesecakes don't get made that often - you need to plan ahead!

The next day, I warmed prepared chocolate icing for 10-15 seconds in the microwave and very gently spread it over the top, completely covering the "fault line". ;)  The diced peanut butter cups were spread out immediately so they'd stick and that was it!  It sliced beautifully, so you could potentially get 12 slices out of one pan, but ours didn't go that far.  I'm pretty sure I'll be making it again on Thanksgiving weekend!

Thursday, July 4, 2013

Time for a change...

... and no, not to the blog, but my kitchen!

For those of you who know me in real life know that I LOVE colour - so much so that when I painted my kitchen 8 years ago I took a bold leap with red.  The bulk of kitchen, i.e. cabinets and walls, were painted ivory but the portion below counter height was red, that is Behr Paint "Daredevil Red" was is an exact match with my mixer Big Red. ;)  The prep and painting took about a week of my time because the red needed one coat of grey primer and three coats of red for full colour saturation.  I separated the two colours with a small cherry border at counter height.  About 5 years ago, I got bored and applied a new, much wider border that looked like a French village street scene.

Now, I do still love red - it's my favourite colour after almost every shade of green, but it was getting a bit worn around the doorways and I was getting bored with it - all of it!  My girls are horrified - they have decreed that almost any other colour will be "boring" because I've been toning down my colour choices in the last few years.  Friends keep saying "but I love that red!"  Sorry gang, but I'm the one living with it, so it's my choice to make the a change.

Where initially it looked French-influenced (border, mugs, bowls, artwork), now it's going to look more rustic.  I have quite a bit of art in the room, including 2 fruit and veg paintings by my daughter, and all my red tools, gadgets and collectibles will remain including this little chicken dish:


When I was in South Carolina, I picked up a really cute repro vanilla extract bottle, that looks like these.  It's an homage to my love of baking:


And so it this, which will get hung on the wall - it's just like my grandmother's egg beater:


I've already displayed vintage cookie cutters in a jar that were my mum's, just like these:


 (All images courtesy Google.com)

I made sure to take before shots, because I really did love how it looked, and I'll take some afters with the new paint colour, new chair covers and accessories from around the house.  After scraping off the border last weekend, this one will be spent washing the walls and priming that red.  Then I'll need another weekend to tape and paint before I can enjoy my handiwork.

Sunday, June 2, 2013

Chocolate Cherry Cupcakes

I'm not going to call myself a bad blogger, just an absent one - life takes over like that sometimes!  Apart from my daughter's upcoming wedding on June 22nd, the other event that took a lot of planning and work was her bridal shower on April 28th.  Baking was only part of all the work, which started with *what* I wanted to bake.

Megan's favourite fruit is the cherry, so I wanted to incorporate it into one of the desserts.  My first thought was a variation of Black Forest Cherry cake.  Most people I know love it - I'm not one of them.  When I was younger my mother made it a LOT.  As I got older, I was surprised with more than one bakery version of this cake, which was too much for my liking!  It's not just the whole combo that I dislike, but I also can't stand whipped cream.  Pretty strange for a baker to admit that, but we all have our preferences and it's never been one of mine.  So I kept Googling for a chocolate cherry combo and I found this recipe at The Cupcake Project blog - the link will take you directly to the recipe.


I made the cupcakes (on the red 2-tiered stand) in a mini size, so that everyone could sample lots of the goodies we made.  They are a very dense, rich chocolate with the flavour of cherry added by using Maraschino cherry liquid.  Boy, were they a hit, especially with our bride-to-be!

The icing was pretty, light pink since cherry preserves are used in the frosting.  I cheated completely with the frosting and didn't make it from scratch.  Betty Crocker came to my rescue with prepared cream cheese frosting and I added only the jelly portion of the preserves (I think some small cherry bits snuck in too) and mixed up a full container of the frosting.  As a combo, there was no cloying sweetness to them, just a nice balance of rich chocolate with cherry.

My lovely daughter Sarah, the Maid of Honour at the upcoming wedding, baked the Martha Stewart gluten free brownies pictured above and I made mini meringues with vanilla chips inside and pink pearl dragees as a decoration.  We had guests with dietary restrictions at the shower, so everything was labelled to avoid any confusion.

The shower was a blast and I sent lots of goodies home with everyone so that I can fit into my Mother of the Bride dress in under three weeks!

Tuesday, March 5, 2013

Gingerbread Cookies

Yes, I know it's over two months since Christmas, but I wanted to share the recipe because it was a bit hit.  The previous Christmas Sarah said she really liked gingerbread, but I ended up baking too much else and ran out of time, so they never got made.  Flash forward a year and this recipe worked out so well that they're now on the official "family favourites" list!   Please note the wobbly letter on each of the big kids' cookies. ;)


I found this recipe in the little added baking cookbook that came with the December 2012 issue of Canadian Living magazine.  I looked at the various gingerbread cookie recipes in my library and this seemed like the most straightforward.  Many of the recipes require 2 kinds of molasses, corn syrup, etc. which I couldn't be bothered with.  I already had a container of "Grandma's Fancy Molasses" at home and it worked just fine.

Ingredients:
  • 3/4 cup (175 mL) unsalted butter, softened
  • 3/4 cup (175 mL) packed brown sugar
  • 1 egg
  • 3/4 cup (175 mL) cooking molasses
  • 4-1/2 cups (1.125 L) all-purpose flour
  • 2 tsp (10 mL) ground ginger
  • 1 tsp (5 mL) cinnamon
  • 3/4 tsp (4 mL) baking soda
  • 1/2 tsp (2 mL) ground cloves
  • 1/4 tsp (1 mL) baking powder
  • 1 pinch salt
Directions:

The original recipe calls for the first steps to be done by hand – seriously?  I used my Kitchenaid mixer bowl for mixing all the dough using the paddle attachment and saved myself a *lot* of grief.  First, I don't have a lot of strength in my hands and second, this ensured that everything blended evenly.  In a large mixer bowl, beat butter with brown sugar until fluffy; beat in egg and molasses. This has been suggested by lots of other bakers before me, but spray your mixing cup with non-stick or lightly wipe with oil before pouring in the molasses.  It will make this step so much easier and the accurate amount ends up in the dough.

In a separate large bowl, whisk together flour, ginger, cinnamon, baking soda, cloves, baking powder and salt; mix slowly into molasses mixture in 3 additions.  Divide the dough into thirds, then shape into flat rectangles. Wrap each and refrigerate until firm, about 2 hours.  I took my dough out of the fridge about 10-15 minutes before I started to roll it out, just to get it to room temp and make it a little more pliable.

Between parchment paper, roll out each rectangle to 1/4-inch (5 mm) thickness. The recipe suggested using large, 5" inch gingerbread boy cookie cutters, which would yield 20 large cookies.  I used my regular Christmas cookie cutters (boy, candycane and mitten) and ended up with around 4 dozen cookies, give or take.  You can also collect the scraps, re-chill and cut them out again.  I was so impressed with how easy this dough was to work with - it didn't break up, it cut cleanly and the recut scrap cookies even baked perfectly.

Arrange the cookies 1 inch (2.5 cm) apart on parchment paper lined baking sheets.  They do not spread while baking, so this is plenty of space.  Bake in 325°F (160°C) oven until firm to the touch and light golden on edges, about 12-15 minutes. Keep a close eye on them so that they don't overbake.  Transfer to racks and let cool completely before storing or icing.

I didn't decorate my cookies until the morning after baking and the "kids" told me they were much more tender after a night's rest in a plastic container.  Rather than make my own royal icing, which is not that hard to do, but since I was running out of time and steam at this point, I copped out and used purchased cookie icing, along with tubes of coloured gel icing.


Images courtesy Google.com


While the icing was wet, I went to town with lots of sprinkles and made boys and girls out of the "boy" shape, along with the initial mittens and trees you can see above.  The big kids loved them and I heard that the cookies that I sent with them to other holiday events where also appreciated by everyone.  I'll make sure next year to leave lots of time to bake these in advance.

Friday, March 1, 2013

Raspberry Crumble Bars

Way back in November, after my last post (what a long time ago!), my lovely best friend Fern came to my place for her belated birthday lunch, which included these treats to go with our coffee.  I warned Fern in advance that she was going to be my first tester for this recipe and I'm happy to say that she loved them.


Image courtesy BarefootContessa.com

When I got Ina's latest cookbook "Foolproof" in October, I knew this was the first recipe I wanted to try.  My first attempt went pretty well and I know that the men in Fern's life enjoyed the extra bars too, so I knew I had a hit on my hands.

Ingredients:
  • 1/2 pound (2 sticks) unsalted butter, at room temperature
  • 3/4 cup sugar
  • 1 teaspoon pure vanilla extract
  • 2-1/3 cups all-purpose flour
  • 1/2 teaspoon salt
  • 10 to 12 ounces good raspberry jam
  • 2/3 cup good granola without dried fruit
  • 1/4 cup sliced almonds
Directions:

Preheat the oven to 350 degrees.  Place the butter and sugar in the bowl of an electric mixer fitted with the paddle attachment and mix on medium speed just until combined. With the mixer on low, add the vanilla.
Sift the flour and salt together and, with the mixer on low, slowly add to the butter mixture, mixing until it almost comes together in a ball.

Prepare a 9" square baking pan by lining with parchment paper - this will make your life so much easier when removing the entire square, before slicing them up.  Ina's instructions call for turning out the dough onto a board before patting 2/3 of the dough evenly on the bottom of a 9-inch square baking pan and about 1/4-inch up the sides. I skipped this step and just eyeballed how much 2/3 of the dough would be and it still worked well.  Spread the dough with the jam, leaving a 1/4-inch border.

If your granola has fairly large chunks (like the Quaker Harvest Crunch I used), pour it into a small plastic bag, zip shut and then crush the granola until the pieces look fairly even.  You can use either a rolling pin or a rounded bottle to do this quickly.  This will ensure that your granola does not brown unevenly while baking.  Mix the granola into the remaining dough with your hands. Break the dough into small bits and distribute it on top of the jam, covering most of the surface. Sprinkle the almonds on top.  As usual, I patted the almonds into the mixture, also to ensure that they didn't overbake.

I baked the bars for 40 minutes until lightly browned, but depending on your oven they may need 5 more minutes.  Cool completely and cut into 9 or 12 bars.  They keep very well in a sealed container, if they last for more than a day at your house - mine didn't!

Friday, November 23, 2012

Gluten-Free Fudgy Brownies

When I was at home recuperating recently, I had time to go through a year's worth of Martha Stewart's "Food" magazine.  I hate having magazines pile up around the house, so I like to go through them and only keep what really interests me, like this recipe.

What I also like to do have treats that everyone can enjoy, if I know I'll be baking for a group of family or friends.  Our family now includes Megan's Belle Mere Sylvia - isn't that much nicer than saying "almost mother-in-law"?  And, because Sylvia is very belle and can only enjoy gluten-free treats, I tried these and hoped she'd enjoy them.  As it turned out, everyone who tried them loved them - including my almost-son-in-law Duncan, who doesn't usually like brownies!


Image courtesy MarthaStewart.com

Ingredients:
6 tablespoons unsalted butter, cut into pieces (plus more for pan or have cooking spray handy)
1/3 cup cornstarch (spooned and leveled)
1/4 cup unsweetened cocoa powder
1/2 teaspoon ground cinnamon
1/2 teaspoon fine salt
12 ounces (1.5 cups) semisweet chocolate chips
3/4 cup granulated sugar
1 teaspoon pure vanilla extract
3 large eggs
1 cup chopped nuts.  The recipe calls for toasted pecans, but I used regular walnuts.

Preheat oven to 350 degrees. Lightly butter or use cooking spray on an 8-inch square baking pan and line with parchment paper, leaving a 2-inch overhang on all sides. Whisk together cornstarch, cocoa, cinnamon, and salt. In a microwave-safe bowl, microwave butter and chocolate in 30-second increments, stirring each time until melted and smooth, about 2 minutes. Rather than trying to whisk everything by hand, I used my stand mixer for the next steps.  Mix sugar and vanilla; add in eggs one at a time until combined. Add chocolate and butter mixture, followed by cornstarch mixture and mix vigorously until mixture is smooth and begins to pull away from side of bowl, about 2 minutes. My mixture didn't exactly "pull away", but the result was still good.  Stir in nuts.

Pour batter into pan and smooth top. Bake until a toothpick inserted in center comes out with a few moist crumbs attached, about 35 minutes, rotating pan halfway through. Let cool completely in pan on a wire rack. Using paper overhang, lift cake out of pan and cut into 16 squares.  It's very important to allow these brownies to be *completely* cool before you cut them and they'll still look quite wet when you do, but will then dry out further to a nice fudgy texture.

Megan actually liked them so much she asked for the recipe for her office United Way fundraiser.  I hope they all enjoyed them too!

Wednesday, November 21, 2012

The Ups and Downs of October

My goodness, it's been two months since I've posted on my own blog - bad, bad, blogger!  I had the greatest intentions of trying all sorts of new recipes in October, but life didn't work out that way.

The month started with lots of repairs to my house, including the entire roof being replaced, right down to the plywood sheeting.  My daughter was back at home for Thanksigiving weekend, which was a real treat.  It was a good thing that I got a lot of garden cleanup done after Thanksgiving weekend, because the rest of the month was a major trip downhill.  What I thought was a really horrible stomach ache on a Sunday afternoon turned into surgery to remove an "emergent" appendix - read "ready to burst" - one day later.  I had great, quick care at Centenary Hospital (part of the Rouge Valley System) and was back at home by Tuesday afternoon.

Image courtesy Google.com

I was told to rest and not do anything, but I didn't need any reminders.  Just sitting in a chair was enough of a challenge, let alone trying anything more strenuous.  Did I feel like crafting, or baking, or blogging - nope.  I didn't have the inclination or energy to sit at my work table or stand in the kitchen making any new creations.

I spent three weeks at home, reading and re-reading favourite books, napping more than I ever thought possible, catching up on daytime TV, watching all the news reports on Hurricane Sandy and the US Presidential election and being royally bored out of my mind by the time I was allowed to return to work.  You know you've got serious cabin fever when the highlight of your day is waiting for the newest Barefoot Contessa cookbook to be delivered by UPS and then giving the delivery guy Hallowe'en candy to say thanks. ;) 

Family and friends were a godsend and I couldn't have gotten through three weeks without them.  From dog sitting, to picking up groceries and Hallowe'en candy and calling to check up on me, they kept me sitting still (which they'll tell you is a hard thing for me to do!) and sane - I love them all.  So now I've been back at work for a while and doing some baking again on the weekends.  Ina's newest book, "Foolproof", has inspired me already and I'll be testing one of the recipes on Friday night.  I'll keep you posted on how it worked and then it's on to some Christmas baking.