Friday, November 23, 2012

Gluten-Free Fudgy Brownies

When I was at home recuperating recently, I had time to go through a year's worth of Martha Stewart's "Food" magazine.  I hate having magazines pile up around the house, so I like to go through them and only keep what really interests me, like this recipe.

What I also like to do have treats that everyone can enjoy, if I know I'll be baking for a group of family or friends.  Our family now includes Megan's Belle Mere Sylvia - isn't that much nicer than saying "almost mother-in-law"?  And, because Sylvia is very belle and can only enjoy gluten-free treats, I tried these and hoped she'd enjoy them.  As it turned out, everyone who tried them loved them - including my almost-son-in-law Duncan, who doesn't usually like brownies!


Image courtesy MarthaStewart.com

Ingredients:
6 tablespoons unsalted butter, cut into pieces (plus more for pan or have cooking spray handy)
1/3 cup cornstarch (spooned and leveled)
1/4 cup unsweetened cocoa powder
1/2 teaspoon ground cinnamon
1/2 teaspoon fine salt
12 ounces (1.5 cups) semisweet chocolate chips
3/4 cup granulated sugar
1 teaspoon pure vanilla extract
3 large eggs
1 cup chopped nuts.  The recipe calls for toasted pecans, but I used regular walnuts.

Preheat oven to 350 degrees. Lightly butter or use cooking spray on an 8-inch square baking pan and line with parchment paper, leaving a 2-inch overhang on all sides. Whisk together cornstarch, cocoa, cinnamon, and salt. In a microwave-safe bowl, microwave butter and chocolate in 30-second increments, stirring each time until melted and smooth, about 2 minutes. Rather than trying to whisk everything by hand, I used my stand mixer for the next steps.  Mix sugar and vanilla; add in eggs one at a time until combined. Add chocolate and butter mixture, followed by cornstarch mixture and mix vigorously until mixture is smooth and begins to pull away from side of bowl, about 2 minutes. My mixture didn't exactly "pull away", but the result was still good.  Stir in nuts.

Pour batter into pan and smooth top. Bake until a toothpick inserted in center comes out with a few moist crumbs attached, about 35 minutes, rotating pan halfway through. Let cool completely in pan on a wire rack. Using paper overhang, lift cake out of pan and cut into 16 squares.  It's very important to allow these brownies to be *completely* cool before you cut them and they'll still look quite wet when you do, but will then dry out further to a nice fudgy texture.

Megan actually liked them so much she asked for the recipe for her office United Way fundraiser.  I hope they all enjoyed them too!

Wednesday, November 21, 2012

The Ups and Downs of October

My goodness, it's been two months since I've posted on my own blog - bad, bad, blogger!  I had the greatest intentions of trying all sorts of new recipes in October, but life didn't work out that way.

The month started with lots of repairs to my house, including the entire roof being replaced, right down to the plywood sheeting.  My daughter was back at home for Thanksigiving weekend, which was a real treat.  It was a good thing that I got a lot of garden cleanup done after Thanksgiving weekend, because the rest of the month was a major trip downhill.  What I thought was a really horrible stomach ache on a Sunday afternoon turned into surgery to remove an "emergent" appendix - read "ready to burst" - one day later.  I had great, quick care at Centenary Hospital (part of the Rouge Valley System) and was back at home by Tuesday afternoon.

Image courtesy Google.com

I was told to rest and not do anything, but I didn't need any reminders.  Just sitting in a chair was enough of a challenge, let alone trying anything more strenuous.  Did I feel like crafting, or baking, or blogging - nope.  I didn't have the inclination or energy to sit at my work table or stand in the kitchen making any new creations.

I spent three weeks at home, reading and re-reading favourite books, napping more than I ever thought possible, catching up on daytime TV, watching all the news reports on Hurricane Sandy and the US Presidential election and being royally bored out of my mind by the time I was allowed to return to work.  You know you've got serious cabin fever when the highlight of your day is waiting for the newest Barefoot Contessa cookbook to be delivered by UPS and then giving the delivery guy Hallowe'en candy to say thanks. ;) 

Family and friends were a godsend and I couldn't have gotten through three weeks without them.  From dog sitting, to picking up groceries and Hallowe'en candy and calling to check up on me, they kept me sitting still (which they'll tell you is a hard thing for me to do!) and sane - I love them all.  So now I've been back at work for a while and doing some baking again on the weekends.  Ina's newest book, "Foolproof", has inspired me already and I'll be testing one of the recipes on Friday night.  I'll keep you posted on how it worked and then it's on to some Christmas baking.

Friday, September 21, 2012

Tips and Tricks for Drop Cookies - What Momma Never Taught Me

Two weeks ago I made a huge (6 dozen) batch of Chocolate Crisp cookies for the United Way kickoff event in my office.  I've made these before for the office gang, but inevitably get told how much they like them and can they have the recipe.  Since I've made them so many times, I can actually rattle off the ingredients and baking order by memory now! ;)
 
Drop cookies like these are something my mother never baked and wouldn't start making now.  She's all about precision in her baking - piped meringue "Kisses", lemon squares that she measures with a ruler when cutting out, pressed Christmas cookies that are all the same size - you get the idea.  So having tips and tricks for drop cookies are what I've learned on my own either with a lot of recipe reading or by watching tons of baking shows on The Food Network.  With this particular recipe, I've gotten questions about "how do you get so many out of the batter?", "how do you get them the same size?" - lots of questions I used to ask before I started baking so often.
 
So here are some of my favourite tips and tricks for drop cookies:
 
Parchment paper is your best friend for every kind of baking.  For about $5 roll, you will have stick-proof cakes and cookies and, after baking cookies you won't have to wash the pans.  You can also keep using them over and over for whatever batch you're making - they don't have to be replaced after one time in the oven.  It's a must-have at my house.
 
 
Use graduated scoops.  They make them in lots of sizes, not just as ice cream scoop measure size which is huge!  I picked up mine over time at Winners and Homesense and they're invaluable.  Your scooped cookies will be the same size, so that you have uniform baking times and know just how many you'll get out of each batch of dough.
 
 
Use hot water with your cookie scooping.  Lots of cookie doughs are very tacky and wet, so I keep a glass of hot water on hand to dip the scoop into before measuring them out.  Place it on a paper towel and tap off the excess water before dipping into your dough, so that you don't have a soggy mess to deal with.
 
Rotate your pans halfway through baking for any kind of cookie. Until I went to a demonstration with Elizabeth Baird, formerly of Canadian Living Magazine, I didn't know why my cookies were always more brown on one side than the other.  Light bulb moment!  Half way through baking, rotate your pans from top to bottom oven racks AND rotate the pan from front to back.  The back and lower half of any oven are generally hotter, so this allows your cookies to bake evenly.
 
Have lots of cooling racks ready.  Once your pans come out of the oven, for most cookies it's best to wait at least a minute before lifting them off.  Generally that means you've got about two dozen waiting to be cooled, it's best to have at least 2 racks waiting to go.  I use three, so that I can let two pans cool on the racks and then place the cookies onto the third rack once they can be handled.  I have a set of these stacking racks, but keep forgetting about them and using the single ones - must get them out again!
 
 
A nice extra - invest in a larger spatula to use as a cookie lifter.  This sounds like an unnecessary item, but if you bake a lot and have tried lifting soft cookies with a plastic lifter, you'll know it's not.  A spatula like this is generally made of metal and nothing like the thicker silicone type, so it will slide *under* the cookies easily, rather than pushing them around on the pan, into the other warm cookies.  Mine is by Wilton and I just love it!
 
Hope these tips are of help!
 
(All images courtesty Google.com)

Thursday, August 30, 2012

Bread and Salt and New Beginnings

Our family has a gift tradition that never varies when someone is moving into a new home - bread and salt.  Two of the most humble items in any home and they're given with the following wishes.  Bread, so that you'll never go hungry and salt, so that your life will always have flavour.
 
 
Image courtesy Google.com

I thought that this was a tradition throughout European countries, but after talking to one of my Italian friends, it seems that it's related to Central Europeans.  Twenty-two years ago, after my marriage had ended and it was time to move out of my parents' place after five months, when I rented my own first place my best friend came with these gifts and a rechargable screwdriver.  Hey, that's how the two of us roll. ;)  I know I took bread and salt to Megan's first shared apartment in the west end of Toronto, along with lots of other groceries.
 
Bread and salt came with us down the highway to Waterloo on Monday to Sarah's first place.  She stuck it out, living at home throughout her undergrad degree, and will now have a great place to live and work on her postgrad studies.  It's a new beginning for both of us.  We tried to give each other as much space as possible - okay, moms don't always do it, but we TRY - and I think the good times outweighed the bad.  I'm going to miss our crazy routines - eating ice cream while we watched The Biggest Loser (seriously), our guilty pleasures watching and snarking on lots of the Housewives series, doing the "Ed Grimley" dance when we were both overtired (this has to be seen to be believed), sharing our mutual OCD about how things "have to" be organized around the house and more things that I can think of right now.
 
Life and changes will continue to happen - that's reality.  As much as I'm going to miss my baby, it's time for her to fly.  So I'm doing what I always do when changes happen - I rearrange things, paint rooms, make plans with my friends and yes, get organized for that next trip down the 401 to Waterloo.
 

Sunday, August 5, 2012

Keep Calm and Have a Cupcake

It's been a crazy summer this year and it's not just because of the insane heat, which I can't stand.  Between Sarah's imminent move and wedding dress shopping with Megan last Saturday, I also got the news that my entire roof needs to be replaced.  That shock took a good week to get over - it's mind boggling how much a roof costs, but mine will be replaced right down to the plywood and I'll have new waterproofing installed that this house has never seen..

For my birthday this year, my co-worker and friend, sister-in-snark and amazing baker buddy Teresa gave me this gift bag.  I told her it's never leaving the house or being regifted, plus I decided it's the perfect mantra for the upcoming year...


I liked it so much that I bought a matching journal from Indigo to carry around with me.  All I need to do this week is call the roofer on Tuesday and tell him he's got the job and hopefully get in some baking time for Duncan's birthday on Friday.

Friday, June 29, 2012

Wow...I really am a Mother of the Bride

There is so much going on right now at our house and unfortunately it hasn't included testing many new recipes.  I've made old favourites and after a bit was eaten at home, the majority has gone to the office.  My co-workers are very happy when this happens.

In addition to Sarah preparing for her move to Waterloo and the Ph.D. in her future, my older daughter Megan and her sweetie Duncan are now engaged...sigh!  The date next June is set, they've reserved a venue and lots of other plans are underway.  I've been told I have free reign when it comes to planning her bridal shower - thanks Megan! - which will be a combination of a lot of fun and not unexpected stress.  Apart from baking, my other very active hobby is paper crafting, so my two die cutting machines will be working overtime on invitations, decorations and more - I can't wait!

One decision Megan made is to have her friend and fellow OCADU alum, Nadia, create her wedding cake, or facsimile thereof.  A co-worker asked if I would be making the cake, but that is SO far out of my skill range I'd never even consider it.  Nadia, on the other hand, is mad talented.  She's also the baker who made the cake for the 4th year student catalogue last year.  Here's that cake, as a little reminder of her skills:


That's her hand painted work all over that cake and it was delish to boot!  Here's her updated website - make sure to scroll over her creations to see them in colour:  Nadia and Co.

The girls always laugh about a comment I made a few years ago.  For some reason we were talking about wedding cakes and I said "No boring cake!  I'm paying for the cake!"  With Megan's ideas and Nadia's skills, I don't think "boring" will ever be used in conversation.

Sunday, June 3, 2012

A new Ina Cookbook in October!

If you're a regular reader of this blog (thanks to all 10 of you!), you'll know I love Ina Garten, The Barefoot Contessa.  I love how her recipes are written and that she tests them repeatedly to make sure they work.  From my experience, every one of her recipes has worked out flawlessly.

So this week, when I got her her email update that leads you to her site, I was thrilled to see that her publisher is releasing her newest cookbook on October 30th this year.  It's called "Foolproof", and I have no doubt every recipe will be!


Image Courtesy barefootcontesssa.com

If you've never visited Ina's site, I highly recommend it - there are lots of great tips, recipes and interviews with Ina - Barefootcontessa.com

I may even treat myself to an autographed copy this year. :)

Sunday, May 6, 2012

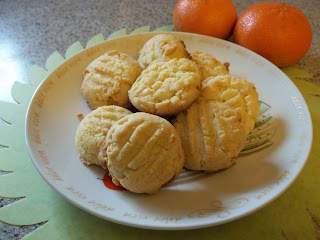
Orange White Chocolate Chip Cookies

I planned to post this recipe on Thursday night, but with a violent thunderstorm going on and a neighbourhood that usually loses power, I held off until today. ;)


This recipe is actually Orange Vanilla Chip Cookies, from "The Complete Magnolia Bakery Cookbook", but it specifies that if you can't get the vanilla chips, white chocolate chips should be used instead.  Since vanilla chips don't seem to be sold in Toronto, I'll have to stock up on them when we take our next shopping trip across the border.  From the reactions of my "taste testers", they had no complaints - all of the cookies were gone before noon on Monday.  I was asked not to keep extra desserts in the house, so my office buddies get all my baking right now!

When I see a cookie dough completely "pull away" from the sides of the mixing bowl completely, I expect it to turn it out perfectly and I'm usually right.  This recipe was no exception and I know I'll be making it many times again.  They're light and crispy on top, soft on the inside - a lovely little treat!

Ingredients:


2-1/4 cups flour
3/4 tsp baking soda
1/2 tsp salt
1 cup (2 sticks) unsalted softened butter
1/2 cup sugar
1/2 cup firmly packed light brown sugar
1 large, room temperature egg
1 tbsp grated orange zest
1 cup white chocolate chips

Preheat oven to 350 degrees.  In a large bowl, sift together the flour, baking soda and salt.

In a large bowl (I used my stand mixer), cream the butter and two sugars until smooth, about 3 minutes.  Add the egg and mix in well.  Add the flour mixture and beat thoroughly.  Stir in the orange zest and the chips.

As usual, I used my 1 tsp scoop to measure out the cookies.  Despite the fact that the recipe yield listed was 3 dozen cookies, I had four dozen after baking.  One dozen should fit nicely on each baking sheet.  Since the cookies were very rounded and I wanted to make sure the dough wasn't raw inside after baking, I flattened them lightly with a wet fork.  Bake for 10-12 minutes - 11 was perfect in my oven.

Cool on the sheets for a minute before removing to a cooling rack and enjoying!


Tuesday, April 10, 2012

A House Full of Peeps

This Easter, for some reason, I decided I just had to use Peeps to decorate something for the holiday.  We didn't have a family tradition of the girls getting them in their Easter baskets when they were little, but the Easter Bunny started bringing them once they got older.

It's unfortunate that as soon as the package is opened, they get stale very, very quickly.  I wasn't too worried about that happening, because I expected they would get eaten in no time and they're just so cute I couldn't resist using them.  My real motivation was making them for my daughter's nieces, because there are no grandkids in my life yet - which is a whole other story and I'm probably going to get really OCD baking for my own g'kids once they're here! ;)

Here's the finished product, from the Easter Bunny to the girls:


Very simple and "old school" this year - vanilla rainbow sprinkle cake mix, topped by buttercream frosting tinted a very light green (doesn't show up well), some green sprinkles and, of course, Peeps!


And here they are, packed up to go:


I hope the girls enjoyed them - I know the big kids had fun eating the other cupcakes and ripping off their little heads. ;)

Tuesday, March 20, 2012

A Waste of Three Sticks of Butter

Last Friday I was eager to bake on the weekend.  The fact that it was also St. Patrick's Day on Saturday was even more of an incentive, because I had two Martha Stewart recipes that I was eager to try - Irish Coffee Cupcakes and Chewy Irish Coffee Blondies.
 
Since my spring garden is off to a great start, I was planning to pick up the Baker for a visit on Sunday because she really, really wanted to see the snowdrops and crocus that are in full bloom.  It would also be a great for a traditional German "kaffee und kuchen" afternoon and I could get her to taste test these new recipes, since coffee is her favourite flavour.  Here's a little bit of the spring garden:
 
 
Wasting Two Sticks of Butter
 
 
Image Courtesy MarthaStewart.com
 
Although my cupcakes weren't as professional as these, they still looked beautiful and the paper liners peeled very cleanly, which doesn't always happen but I guess having two sticks of butter in the batter didn't hurt.  The best way I can describe the taste is "meh" - they're moist but the coffee flabour was very mild for something named "Irish Coffee".  When the Baker and I had them on Sunday afternoon, my mum suggested that if made them again, I should brew extra strong coffee, instead of just using instant granules as listed in the recipe, for a better flavour.  Since I don't have whiskey at home, which was called for as flavouring in the icing, I used Irish Mist liqueur.  We liked the frosting better than the cupcakes!  Somehow I don't think I'll be making them again.  Here's the recipe link, if you want to give them a try:  Irish Coffee Cupcakes
 
And the last stick went to...
 
 
Image Courtesy MarthaStewart.com
 
The recipe for the blondies is from the March issue of Martha Stewart Living.  It stated that they should be baked for 25-20 minutes, but less for a more chewy blondie.  Since my oven runs quite hot, I only baked them for 22 minutes, but was not impressed with the results.  They were dry and no amount of tasty glaze (also flavoured with Irish Mist) on top made a difference.  There was no way I was taking them to the office and I didn't even bother asking my mum to try them.  I think the only way they'd be any good right now is dipped into an actual cup of coffee before eating them.  Maybe you'll have better luck with them than I did - Chewy Irish Coffee Blondies
 
I also need to add that the first time I bake a new recipe, I don't deviate at all from the essential ingredients or the instructions, to make sure that it turns out as described.  I give myself a pass when it comes to using another flavour of booze in the icing. :)
 
Hopefully next weekend things work out better when I test out cookies from the Magnolia Bakery Cookbook.

Sunday, March 4, 2012

Acorn and Oak Leaf Bundt Pan - and a cake too!

It's no secret that I love shaped cake pans and when I find a great deal on a well made, heavy pan, I won't pass it up!  I found this pan at the Loblaw's Superstore after Thanksgiving last year for only $12.44.  I used it the first time for a Hallowe'en cake but, the chocolate cake really didn't show off the shape of the pan, so it needed more testing. ;)


I haven't been posting much (gee, d'you think?), but I try to bake every weekend.  The last time I made this Apple Bundt cake it was big hit, so I thought I'd try it again with the new pan.  I think it looked lovely dusted with icing sugar to show off the shape and it tasted as good as the first time I made it.  I used both Macintosh and Granny Smith apples (above) in the recipe to keep the apple-sugar-cinnamon mixture from getting too runny, but there was still some tasty carmelization around the top of the pan, as you can see here.


I'm going to wait until the fall to use the "muffin" pan I found on sale that day for the same price.  Wait until you see the adorable three dimensional pumpkins it makes...

Tuesday, February 7, 2012

Some of my favourite tools

I've been thinking about posting a tribute to my favourite tools for a while now, especially since I haven't been baking much in the last few weeks.  Not that I've stopped baking completely - I've made many old faves since January - but the craziness of Christmas baking is over until December rolls around again.  Next weekend I'll be making lots of treats for my office buddies and decorated sugar cookies for some adorable little kids.

These are my absolute favourite tools - the All-Clad graduated measuring cups and spoons, which my daughter gifted me for Mother's Day two years ago.  Until that time, I was using a set of spoons and cups from X-ess Cargo (seriously, that's how they spell it) that cost 99 cents per set.  I should have know that a cheapo set wouldn't have truly accurate measurements, but didn't realize how off they were until I started using the new set.


Image Courtesy of Williams-Sonoma

Aren't they gorgeous?  I never, ever put them in the dishwasher and, for me, that's saying something!  Not only are they beautiful in their simplicity, but they are *heavy*!  Since All-Clad makes some of the best cookware on the market, you can actually use the one cup measure on the stove to melt butter, it's that heavy.

Another item that I find really useful is a Tupperware pastry rolling mat.  It displays the sizes for lots of pie pastry and lists of measures around the edges of the mat.  Not nearly as pretty, but so very practical:

Image Courtesy of Google.com

I also like that the mat is red... ;)

Saturday, January 14, 2012

It's almost a rainbow of sprinkles...

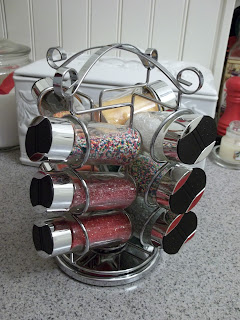
A few months ago this brand new, orphaned spice carousel came my way and I knew I could find a use for it sooner or later.  After Christmas, I tend to go a bit nuts around the house, tossing and purging cupboards and closets.  It's also when I came up with this idea for the carousel:


I have a lot - and I mean a LOT - of different sprinkles for desserts.  Apart from simple sprinkles in solid colours, I've also got them in different shapes for different holidays.  Because of the size of the two jar openings, either to sprinkle or spoon out, I knew not all of them would work.  I got out all my miscellaneous containers and jars, realized I had 12 that would fit and started to fill them.

I'm very happy with the results.  The carousel sits beside my microwave, on the opposite side of the kitchen from my usual photo spot and it's adorable to look at.  While it's not a true rainbow of colours, I think it's still pretty cute. :)


Apart from saving cupboard space, the other bonus is that when I look at them, they inspire me with future baking ideas. :)

Friday, January 13, 2012

Two-Tiered Red Cakestand - I couldn't resist!

I love the colour red and I'm a sucker for a good deal, especially when it's an item like this!


My daughters like to tease me about how many cake stands I own.  I know my fascination with them started with the first, simplest one that I inherited from my paternal grandmother.  During the 50's in Toronto, there was a chain of bakeries called the "Women's Bakery" and for a time my grandmother worked in one very close to our house.  When the location closed, the staff were allowed to keep some of the store items and my grandmother kept an absolutely simple, heavy glass cake stand.  When my mother was downsizing years ago, I inherited the cake stand and my collection began!

Although I'm on a very tight budget right now (see "Expired Union Contract", "Pig Headed Mayor", "Future Income Uncertainty" etc.), I couldn't resist a trip through my local Winner's store yesterday to see if anything was left in the deep discounted Christmas section.  This stack caught my eye, especially because I knew the pieces would create the stand above.  I'm guessing that more than one person picked them up and put them back again because they weren't in a box with a photo:


The plates didn't have the lovely red sale sticker, but after one of the staff checked the price for me, I knew I wasn't going to leave it there!


At my house, red isn't a Christmas colour.  It's the colour of my favourite appliance, it wraps around the lower half of my kitchen walls and it just makes me happy to be surrounded by it.  And hey, Valentine's Day is just a few weeks away!

Monday, January 2, 2012

A new year, new cookbook inspirations

Another holiday season is over, along with all the rushing, baking and angsting that you didn't make everything you planned to!  Ah well, Valentine's Day is coming up and there will be lots of opportunities to try new things this year.

For me, it will include the "The Complete Magnolia Bakery Cookbook" -


I had been eyeing this cookbook on Amazon for a while and with the "Look Inside" feature, really liked the variety of recipes included and how the book is laid out.  I had it on my "Wish List" and my lovely daughter surprised me with it for Christmas.  This doesn't ever mean that another cookbook will replace my Ina favourites (I shudder at the thought!), but I do enjoy other cookbooks that are equally well made in terms of how they describe a recipe.  For me, a good cookbook doesn't mean overly long ingredient lists or complicated instructions.  I'm much happier and more successful using a cookbook that focuses on the best ingredients you can possibly find and has recipes that have obviously been tested so many times that it's hard to fail.

The other reason I was interested in this cookbook is that my daughters and I visited one of the Magnolia Bakery locations in NYC the last time we were in the city.  If you're a fan of Sex and the City as the three of us are, you'll probably remember the episode when Carrie and the girls visit the original Magnolia location in the West Village and sit outside enjoying their cupcakes.  We were only one block from the 49th Street and 6th Avenue location, so there was no way we were going to miss these cupcakes on our visit.  Here's what we bought to share - clockwise from the top left, they were Red Velvet, Lemon Curd, the Classic Carrie (vanilla) and S'mores:


And, five minutes later, this is the after - thanks to Megan for recording this massacre ;) :


We all agree that the Carrie was "meh" (vanilla cake and frosting), but the S'mores was our all around favourite.  I also love the fact that you can go a bakery in NYC that stays open until midnight!